In case anyone else can learn from my experience, here is what I learned in having my flybridge helm removed for transport.
I paid a pro to disassemble, but had to do most of the reassembly because the local guys didn't have time to do it for a month or two.
-It is impossible to "over label" the wires as they are disconnected. The guy that disconnected my helm did a pretty good job, but didn't label everything. I would even suggest labeling where the wire harness attaches to the little rubber support thingies (that is the technical term).
-I should have insisted on a bunch of pictures being taken before disassembly. The guy doing the disassembly didn't have a digital camera. I should have had him borrow one and take pictures of EVERYTHING before they started cutting wires. Even just a couple of pictures would have made a HUGE difference.
-It is far easier at reassembly time if the disassembler unscrewed the positive and negative bus bars without disconneting the wires, than it is if the bars are left screwed in place with all of the wires removed. My disassembly guy de-wired one bus, and just unscrewed the other one from under the helm. The wired, but unscrewed one just required putting 2 screws back in... while the empty bus meant I had to track down every lead that needed reattached.
-The previous owner had full sized copies made of the Carver wiring diagrams, and he had them laminated with a very heavy laminate. What a god-send! Having the big bridge wiring diagram with the key to all of the wire labels on the back (ie. wire "Y = positive bus power") was incredibly helpful.
-The upper and lower helm wiring are pretty much identical for the instruments and gauges that are duplicated in each station. Looking at the back of the lower panel cleared up a bunch of questions and reassured me that the instruments were hooked up correctly before turning the keys for the first time.
-It is better to verify the routing of each cut wire before you crimp it back together. I had one or two that I crimped back together just to realize later that I had to cut and re-route so that another wire in the bundle could reach and be reconnected to it's other half.
-Headlamps ROCK! I got my money's worth out of my $10 WalMart LED headlamp within the first 5 minutes.
-A good wire stripper turns rewiring from a nightmare to an inconvenience.
-If I got stumped on something, I set that task aside and worked on other things. Eventually, most everything was hooked up and the few remaining wires purposes became easier to discern because there wasn't much left that they could be attached to.
-If you have 6 big guys lifting the helm station from the roof of the aft cabin, rotating it 180 degrees, and setting it in place on the bridge isn't that bad. The helm is still REALLY heavy. With 6 guys there can always be one or two that is not lifting, but repositioning to receive a hand-off. I'd say that 4 big guys is probably the minimum that you might want to try.
-The task is do-able, although once or twice I openly questioned the decision to buy a boat that would require this level of disassembly for transport to my "home" lake. Knowing what I know now I would do it again, with a few minor changes noted above.
While I suspect none of this will help anyone right now, hopefully if anyone searches on "flybridge removal" this will turn up and make it easier on them.
Here is what it looked like with the helm removed. Check out the complete mess of wires.

And here is my helm and tackle station where they were strapped down on top of the aft cabin.

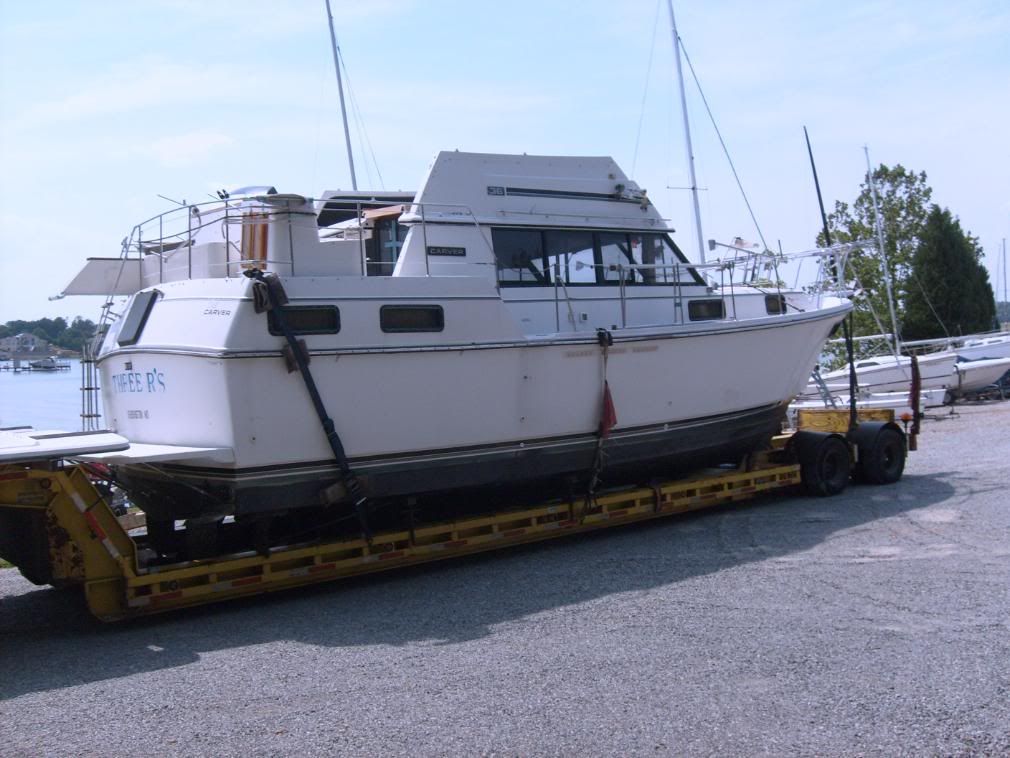
One more... here she is on the trailer. You'll notice that the flybridge surround is still in place. I had 4 transport companies tell me that it could not be transported unless the entire flybridge was removed. Once they got her loaded she measured 14' exactly, which I'm told is the max height that they could transport without having a pole truck and rear escort run with the truck.
Jeff
I paid a pro to disassemble, but had to do most of the reassembly because the local guys didn't have time to do it for a month or two.
-It is impossible to "over label" the wires as they are disconnected. The guy that disconnected my helm did a pretty good job, but didn't label everything. I would even suggest labeling where the wire harness attaches to the little rubber support thingies (that is the technical term).
-I should have insisted on a bunch of pictures being taken before disassembly. The guy doing the disassembly didn't have a digital camera. I should have had him borrow one and take pictures of EVERYTHING before they started cutting wires. Even just a couple of pictures would have made a HUGE difference.
-It is far easier at reassembly time if the disassembler unscrewed the positive and negative bus bars without disconneting the wires, than it is if the bars are left screwed in place with all of the wires removed. My disassembly guy de-wired one bus, and just unscrewed the other one from under the helm. The wired, but unscrewed one just required putting 2 screws back in... while the empty bus meant I had to track down every lead that needed reattached.
-The previous owner had full sized copies made of the Carver wiring diagrams, and he had them laminated with a very heavy laminate. What a god-send! Having the big bridge wiring diagram with the key to all of the wire labels on the back (ie. wire "Y = positive bus power") was incredibly helpful.
-The upper and lower helm wiring are pretty much identical for the instruments and gauges that are duplicated in each station. Looking at the back of the lower panel cleared up a bunch of questions and reassured me that the instruments were hooked up correctly before turning the keys for the first time.
-It is better to verify the routing of each cut wire before you crimp it back together. I had one or two that I crimped back together just to realize later that I had to cut and re-route so that another wire in the bundle could reach and be reconnected to it's other half.
-Headlamps ROCK! I got my money's worth out of my $10 WalMart LED headlamp within the first 5 minutes.
-A good wire stripper turns rewiring from a nightmare to an inconvenience.
-If I got stumped on something, I set that task aside and worked on other things. Eventually, most everything was hooked up and the few remaining wires purposes became easier to discern because there wasn't much left that they could be attached to.
-If you have 6 big guys lifting the helm station from the roof of the aft cabin, rotating it 180 degrees, and setting it in place on the bridge isn't that bad. The helm is still REALLY heavy. With 6 guys there can always be one or two that is not lifting, but repositioning to receive a hand-off. I'd say that 4 big guys is probably the minimum that you might want to try.
-The task is do-able, although once or twice I openly questioned the decision to buy a boat that would require this level of disassembly for transport to my "home" lake. Knowing what I know now I would do it again, with a few minor changes noted above.
While I suspect none of this will help anyone right now, hopefully if anyone searches on "flybridge removal" this will turn up and make it easier on them.
Here is what it looked like with the helm removed. Check out the complete mess of wires.
And here is my helm and tackle station where they were strapped down on top of the aft cabin.
One more... here she is on the trailer. You'll notice that the flybridge surround is still in place. I had 4 transport companies tell me that it could not be transported unless the entire flybridge was removed. Once they got her loaded she measured 14' exactly, which I'm told is the max height that they could transport without having a pole truck and rear escort run with the truck.
Jeff