Mounting helm seat on repaired deck

alk

Administrator
Staff member
Member
Joined
Jul 27, 2001
RO Number
5508
Messages
1,243
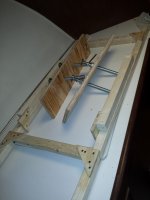
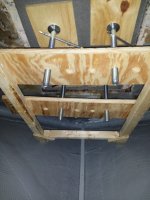
Season is almost done, and getting ready to pull the Viking 43. the list of winter projects isn’t too long, but the big one is repairing a section of deck at the upper station. Where the helm seat is mounted wasn’t done very well, apparently, because water penetrated. A section of the core, about 6 sq feet, has to be replaced.

I’m ready for the core and glass repair - but not so sure about mounting the seat base. Mainly because the deck is not flat; arched, cambered, not sure what the correct term is, but it’s higher in the center and curves down towards each side. The aluminum pedestal base for the seat is flat. should I glass a flat section ( on top of the new core) to mount the base to? Load it up with caulk to make a flat “bed”? I haven’t been able to find any YouTube’s or other online info on the best way to do this repair, so it doesn’t start leaking again. Suggestion? Thanks!
 
What did Viking use as core, balsa? What are you going to use as replacement?

Since you re going to be reinstalling the seat base, I would probably use Coosa to replace the rotted core as it is very strong. The downside is that it doesn’t bend much so you may have to kerf the Coosa to bend it. Or you could use Divinycel foam core which bends pretty well but needs more glass to prevent crushing when installing the seat base. Or use Divinycel with a Coosa pad where the seat base will be.

You really can have a gap under the base as the seat will may rock a little and soft sealant isn’t going to help
 
  • Like
Reactions: alk
Our Hatteras had wooden rings that were mated to the deck. They were substantial and formed out of thick teak or mohagany as I recall. It can be made of sections. Some other wood of substance could certainly be used instead.

I used coosa to repair our foredeck. If you layer it with thin stock panels cut to mate and easy to manage there is no need to kerf it. Just overlap any joints with the next layer. I was pushing it up from the bottom starting in the center and moving out. I have a feeling in your case that would mean taking down a headliner. As such, maintaining any "crown" is going to be difficult unless the bottom layer of glass is stout or you find a way to support it. In our case the top layer of glass was not. I built a collapsable frame that I could move around under the fordeck to press sections of coosa into. I troweled onto the coosa with thickened epoxy using 1/4 inch notch. I used some cheap aluminum jack stands that I took apart to push up from the frame. By screwing the end of the jack stand up into the ceiling I was able to restore the crown using 3/8 coosa that had a layer of glass in the middle.
 

Attachments

  • Foredeck1.jpg
    Foredeck1.jpg
    101.6 KB · Views: 9
  • prep6.jpg
    prep6.jpg
    134.3 KB · Views: 9
  • prep7.jpg
    prep7.jpg
    192.7 KB · Views: 9
  • Like
Reactions: alk
I am not sure what is in there now - should know in a few weeks when I start hacking it apart. But the boat is a 1976, so Balsa would be my guess. I am planning on using 3/4” marine plywood; was thinking about coosa, but I’ve never worked with it before.

i am pretty sure the headliner section is coming down, which I’m not thrilled about. But the current seats are bolted thru; I know that because one of the bolts popped thru the headliner when my large butt was sitting at the helm, and the deck was flexing in some nice sized waves. Once I get the headliner down and top skin of glass cut off, I should have a good idea how I’m going to rebuild the deck.

Just not sure what I’m going to do about the seat base. I noticed this evening that the ‘co-Pilot’ seat had a wood base underneath - with the bottom curved to match the deck. And the captain‘s seat base was screwed right to the deck. I guess the angle is steeper where that co-Pilot seat is, hence the need for the curved base. I wonder if the curve was sanded into the wood, cut with a bandsaw, or some other method? the wood is trashed, but if I don’t use wood, I could perhaps use the old one as a mold ( or reverse mold I suppose ) to make a fiberglass replacement? I think I need one for the captains seat too, even though there isn’t one there now.
 
Personally I don’t want to use wood unless it s for aesthetic reasons. There are far better materials nowadays incl starboard, Coosa, Divinycel or PVC. Divinycel is the best core material. If you need to have a spacer between the base and the deck use some starboard which you can easily shape with a belt sander
 
  • Like
Reactions: alk
I thought I remembered reading somewhere that wood was still a great material for a few applications - and the area of a deck that supports seats was one of them. But not sure where I saw that. Doing some more research this morning, looks like divinycel with the grids pre-cut makes a good core for curved decks?
 
Last edited:
Coosa was a breeze to work with and the final result was rock solid. Plywood is going to be challenging unless it is flat. Especially if it is 3/4 thick. I'd give a 'cell distributor a call about curved applications. BTW I used an oscillating tool with an offset blade to clear out the old rotten balsa. Frame up from the bottom before you put any serious effort into the removal. If the bridge is enclosed you may be lucky with a small amout of rot. But given the age be ready for a big job because the rot spread out. Either way you go open about a square foot and poke around to see if there is substance or not.
I think you will be working with small sections regardless of the material chosen to maintain/restore the crown. Otherwise some hefty weights will be needed to hold the ends down.
If the headliner is coming down, that gives me pause to think about doing it from the bottom up. If left alone the top skin can be saved and the bottom is easily replaced. I was working in the anchor locker on my back. It sucked. Prior to starting I cleaned the locker and repainted it. All of the old balsa came down and was easily vaccuumed up but what a mess that would make of the saloon. Plastic will only cover just so much.

Is this the model Viking?


Edit: Have you sounded the deck with a phenloic hammer? Ever tap should yield a crisp crack like sound.
 
Last edited:
Yes, same model. If you look close enough you can see one of the seat bases in the helm picture. I have sounded the upper deck. It didn’t sound great. But the only spot with any flex is under the seat bases. So I’m hoping to limit the repair to that area. however I won’t be surprised when it grows ( and grows).

Bending 3/4 plywood is easy, if you cut 1/2 kerf cuts ( and then fill with thickened glass at install) - how close/how many cuts depends on the amount of curve. I have seen some videos , boatworks today on YouTube, where he had about same curve as mine - so I figured I would start with similar cut pattern that he used. I looked at the coosa product page today, I could not get a clear idea how to achieve the curve. But the scored dyvinicell looks like a good option. Just not clear if it supports the weight of a seat base.

My top skin is not in great shape - much of it is reusable, but all cracked around the seat bases. So I don’t think I’m even going to try from below. There is a small spot by the windlass that I may attempt from below, but going to do the deck from above.

this is what I’m starting with.

while some people online claim this guy is overhyped, I used his videos to repaint my sailboat a few years ago, and it came out great. havent found any good videos yet of anyone working with modern core materials.
 
You don’t need scored Divinycel, the solid sheets will bend enough to follow the curve of the deck

I would just used new cloth for the top layer. Trying to salvage the old skin isn’t going to be any easier and you will have to repaint the non skid anyway
 
do you need to vacuum bag when glassing divinycel? I say that like I know what it is, but I have never done it, or even seen it done. However, I keep running into it when looking into working with this material.

If i go with another material under the seat bases, do I need to scarf or otherwise create joints between the two materials - or just butt them together with glass on both sides?
 
Yes, same model. If you look close enough you can see one of the seat bases in the helm picture. I have sounded the upper deck. It didn’t sound great. But the only spot with any flex is under the seat bases. So I’m hoping to limit the repair to that area. however I won’t be surprised when it grows ( and grows).
That is pretty much how they looked on the Hatteras. Fortunately I did not have to go after the helm. Hopefully the railing stantions and other screws that hold things down like the helm didn't leak badly.
 
do you need to vacuum bag when glassing divinycel? I say that like I know what it is, but I have never done it, or even seen it done. However, I keep running into it when looking into working with this material.

If i go with another material under the seat bases, do I need to scarf or otherwise create joints between the two materials - or just butt them together with glass on both sides?
I scarfed into the balsa with coosa.. Don't bother with mixing your own thickened epoxy for use in a tube gun. It will kick before you can push it out. I used some of these (damn they got expensive!) : https://www.westmarine.com/west-system-six10-thickened-epoxy-adhesive-10287571.html
 
No need to vacuum bag. Vacuum bag just saves epoxy. The closed cells of the Divinycel absorbs some resin to form a good bond. That s what I used to build my 26 classic sailboat.

If you don’t overtighten the bolts it will be fine. I ve installed cleats thru it.
 
finally started on the core removal - and I have quite a mess on my hands. Always looks so easy on the youtuber's videos! Original core had three layers of glass, and two of wood - bottom 3/4" looks like an end-grain balsa. That is covered by a layer of glass, and then what appears to be a sheet of 3/8" balsa. Total core ( not counting bottom layer of glass which was not removed, is 1 1/4". The 3/8" balsa is in good shape, and except for directly under the seats still well laminated to the deck. The end grain balsa did not fare as well. From the seat bases, and extening about a foot in each direction looks like mulch.

I was originally thinking plywood, then balsa, but no way I am using wood for the new core. My biggest concern now is not the new core material, it's getting all of the wet & damaged core removed. Fear is that I might need to lift the helm console, radar arch, and pretty much the entire bridge. Or maybe just foam under the seats, leave the rest as is, and spend my time & money getting the helm enclosed so as least I don't continue to soak what is there.


20230925_100910.jpg20230925_102316.jpg
 
I am thinking remove a section at a time overlapping when the next section is installed. Maybe that way the crown can be maintained? If you are going to stop after the helm seat then seal up all of the screws that hold things down. I won't hawk coosa again except to show you what I wound up with. This is 1.25 thick. Three layers of Coosa Bluewater with thickened epoxy in between. Two layers of glass under it all AFTER I pressed the coosa up into the ceiling of the anchor locker overlapping several sections of 3 layers. The obvious unpressed glue is where the windlass axel came through the deck. I am thinking if you work from the top it would be a tough call to get anything in and somewhat curved without kerf cuts.


CoreBottom.jpgCoreSide.jpg
 
Thanks for the pics and link BB. My grandson has a project center console which needs deck and possibly transom work. I think this will be a good product for his application.
 
Thanks for the pics and link BB. My grandson has a project center console which needs deck and possibly transom work. I think this will be a good product for his application.
Bob keep in mind I was working with some room under the deck and was able to press it up in sections (see the earlier posts). Pushing it down into a flimsy layer of glass that is not supported could lead to a really wavy nasty result. I will say that core sample is representative of what was under a full on Gally Maid windlass when I was done, that weighs a ton.
 
Last edited:
Good point. If/when he decides to get started on the project we can then see just how much will be involved.
 
Back
Top